Investing in a DTG printer is one of the most exciting steps you can take in the custom apparel industry. Whether you are scaling an established print on demand business or just starting a boutique t-shirt brand, the ability to print stunning, full-color designs directly onto garments is a game-changer. However, unlike standard desktop paper printers, a commercial direct-to-garment machine is a highly sophisticated piece of industrial equipment. It requires respect, understanding, and above all, rigorous maintenance. Check out the Best info about dtg printer.
The secret to maximizing your return on investment and keeping your custom t-shirt production costs low is not just finding the cheapest blank garments. It lies in maintaining print head health and preventing costly machine downtime. A well-maintained machine produces vibrant colors, crisp details, and operates reliably day in and day out.
In this comprehensive masterclass, we will explore the critical routines, environmental controls, chemical processes, and industry secrets you need to know to ensure your machine enjoys a long, profitable lifespan.
The Anatomy of High Resolution Inkjet Garment Printing
To truly understand why maintenance is non-negotiable, you must first understand how your equipment works. Direct-to-garment printing operates similarly to a highly advanced desktop inkjet printer, but the variables are infinitely more complex.
Instead of printing onto smooth, uniform sheets of paper, your machine is depositing liquid pigment ink for fabric onto woven, textured materials. Cotton, polyester, and blends all react differently to liquids. To achieve high resolution inkjet garment printing, the machine’s print heads feature thousands of microscopic nozzles—some smaller than a human hair.
These nozzles must fire perfectly synchronized micro-droplets of ink to recreate complex gradients, photorealistic images, and vibrant solid colors. Because pigment inks are formulated to bind with fabric fibers rather than sit on top of them (like plastisol), they contain solid binders and chemical agents that are prone to drying, separating, or clogging if left stagnant.
Understanding this delicate micro-plumbing system is the first step toward becoming a proactive, rather than reactive, machine operator.
How Pigment Ink Behaves
Standard dye inks dissolve completely in liquid, much like sugar in water. Pigment inks, however, consist of microscopic solid particles suspended in a liquid carrier—more like sand mixed into water. Over time, gravity pulls these solid particles to the bottom. If the ink sits idle in your printer’s lines, dampers, or print heads, it will settle, thicken, and eventually cause a total blockage. This is why consistent movement and daily maintenance are the lifeblood of your machine.
Chapter 1: The Invisible Requirement – Environmental Control
Before you even touch a cleaning swab or run a nozzle check, you must master your printing environment. More DTG printers are ruined by poor climate control than by any other operational failure.
Textile Printing Humidity Requirements
The microscopic nozzles in your print head are constantly exposed to the air. If the air in your workspace is too dry, the ink inside those nozzles will dry out, leading to clogs, banding (horizontal lines in your prints), and eventually, irreversible print head damage.
To prevent this, strict textile printing humidity requirements must be met.
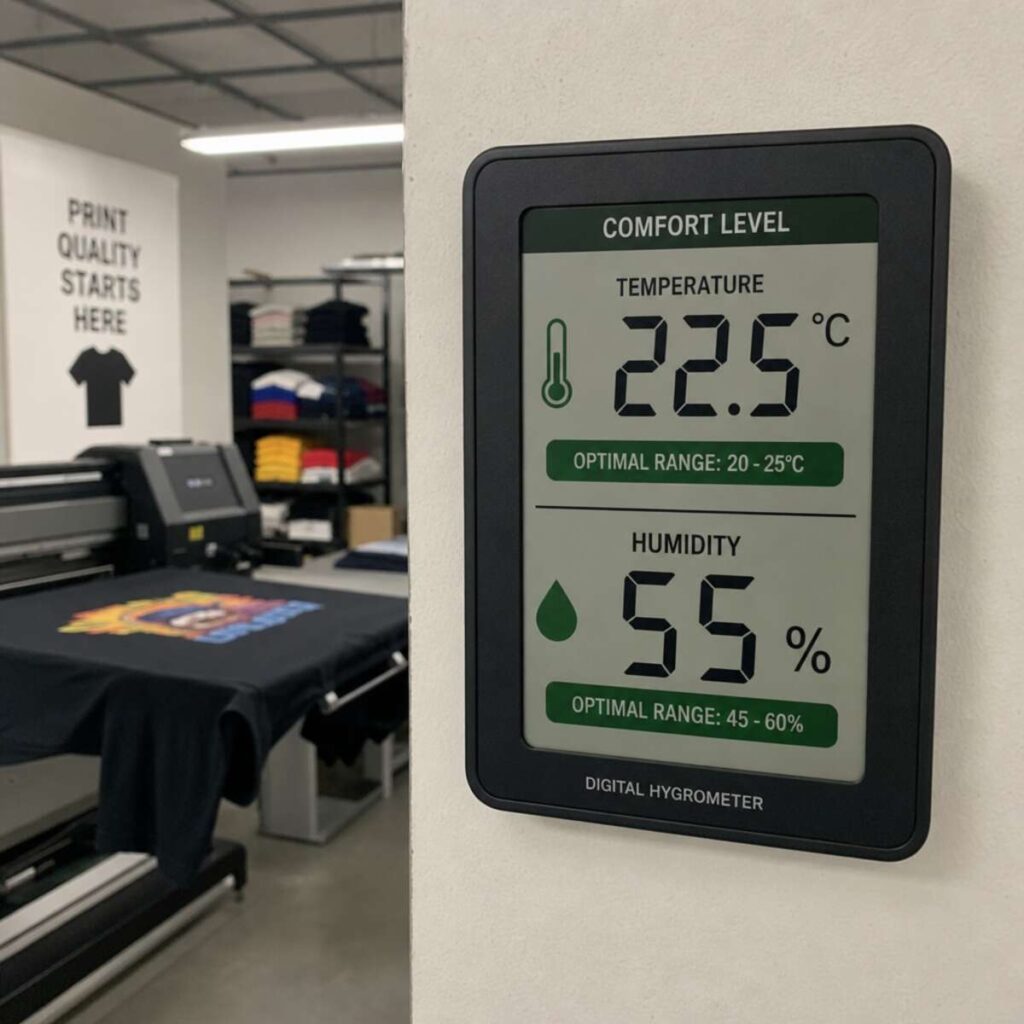
- Ideal Humidity: Keep your print room between 45% and 60% Relative Humidity (RH).
- Ideal Temperature: Maintain a consistent temperature between 68°F and 78°F (20°C – 25°C).
Actionable Tips for Environmental Control:
- Invest in a Hygrometer: Place multiple digital hygrometers around your print room to monitor moisture levels accurately.
- Buy an Industrial Humidifier: Standard bedroom humidifiers will not suffice for a commercial print shop. Invest in a heavy-duty, self-filling humidifier that can output several gallons of moisture a day.
- Avoid Direct Airflow: Never place your machine directly under an AC vent, heating duct, or a ceiling fan. Moving air accelerates ink drying at the print head.
Dust and Lint Management
Apparel naturally produces lint. Every time you load a hoodie or a t-shirt onto the machine, invisible micro-fibers are released into the air. If these fibers settle on the print head or the capping station, they act like a sponge, soaking up ink and creating a thick, sludgy mess that blocks the nozzles.
- Lint Rollers: Vigorously lint-roll every garment before applying pretreatment and again before loading it onto the platen.
- Air Purifiers: Keep HEPA air purifiers running in the room to capture airborne lint.
- Clean Floors: Sweep and mop your print room daily. Avoid carpeted rooms entirely, as carpets generate and trap immense amounts of dust.
Chapter 2: The Daily Maintenance Ritual
Consistency is the golden rule of direct-to-garment printing. A quick daily routine can save you thousands of dollars in replacement parts. Treat your printer like a high-performance sports car—it needs to be warmed up, checked, and wiped down every single day, even on days you aren’t printing.
1. The Morning Shake: Agitating the Inks
As mentioned earlier, pigment inks settle. This is especially true for white ink, which we will discuss in depth later.
- Action: Every morning, before powering on the machine, gently agitate your ink cartridges or bulk tanks.
- Technique: Do not shake them violently like a cocktail shaker, as this introduces air bubbles into the lines, which can cause ink starvation during printing. Instead, gently invert the cartridges back and forth 10 to 15 times.
2. The Nozzle Check
The nozzle check is your printer’s daily health report. It prints a small grid or stair-step pattern for every color channel.
- Action: Print a nozzle check on a piece of clear film or a scrap piece of paper.
- Analysis: Inspect the pattern closely. If all the lines are crisp and solid, you are ready to print. If there are gaps, missing segments, or fuzzy lines, you have clogged nozzles.
- Resolution: Run a standard print head cleaning cycle through your software, then print another nozzle check. Repeat up to three times. If the clog persists, do not keep running heavy cleanings (this wastes ink and can cause pressure issues). Instead, look into manual cleaning of the capping station.
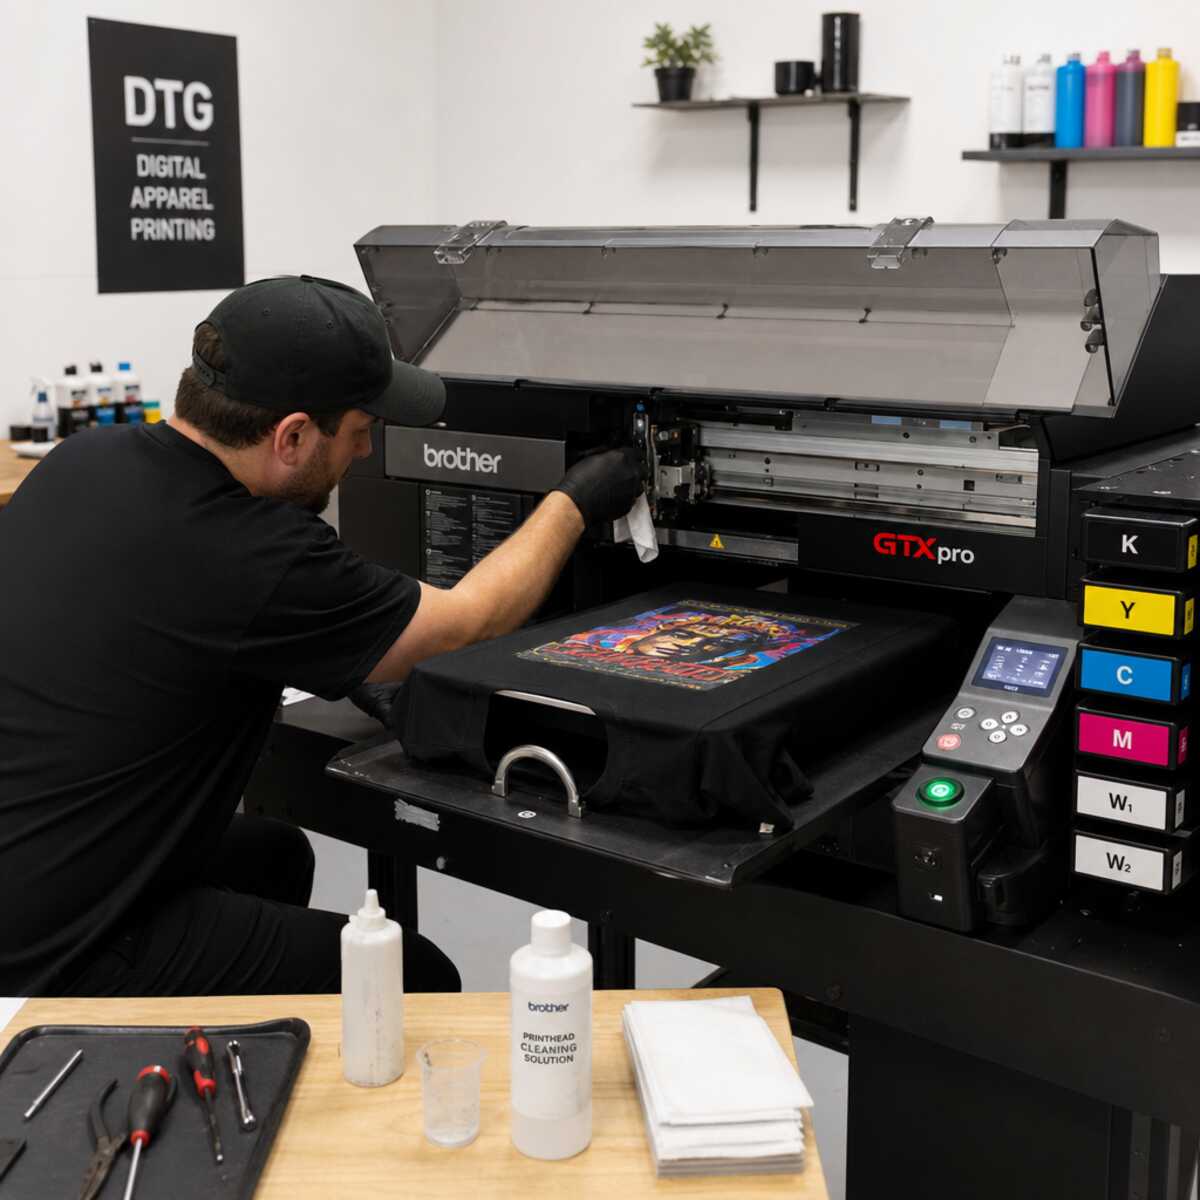
3. Cleaning the Capping Station and Wiper Blade
The capping station is the rubber pad that seals against the print head when the machine is idle, preventing air from drying out the nozzles. The wiper blade is a small rubber squeegee that physically wipes excess ink off the print head. If either of these parts is dirty, your print head will suffer.
- Daily Action: Using specialized cleaning solution and lint-free foam swabs (never use Q-tips, as cotton fibers will detach and clog the head), gently clean the rubber seal around the capping station.
- Wiper Blade: Wipe down both sides of the wiper blade to remove coagulated ink. A clean wiper blade ensures a clean print head.
Chapter 3: Mastering the White Ink Management System
If you ask any experienced operator what the hardest part of maintaining a DTG printer is, the answer is almost always the same: white ink.
White pigment ink is heavily formulated with Titanium Dioxide (TiO2)—the same heavy mineral used in sunscreen and white paint to provide opacity. Because titanium dioxide is heavy, it settles incredibly fast. If white ink is left to settle in the lines, it turns into a thick paste that will permanently destroy your print head and ink delivery system.
How the WIMS Works
To combat this, modern machines are equipped with a White Ink Management System (WIMS). The WIMS is an automated system consisting of a small motor and a peristaltic pump that constantly circulates the white ink from the main tank, through the lines, and back again, keeping the titanium dioxide perfectly suspended in the liquid carrier.
Maintaining Your WIMS
While the system is automated, it still requires your oversight:
- Check the Circulation: Visually inspect your white ink lines daily. They should look completely opaque and bright white. If they look watery, translucent, or separated, your pump may have failed, or your filter may be clogged.
- Filter Replacements: The WIMS relies on small in-line filters to catch coagulated ink particles before they reach the print head. These filters must be replaced strictly according to the manufacturer’s schedule (usually every 1 to 3 months). Failing to replace a $10 filter can result in the loss of a $2,000 print head.
- Weekend Protocols: If you are leaving the shop for the weekend, ensure the printer is left plugged in and powered in “sleep” or “maintenance” mode. This allows the WIMS to wake up periodically and circulate the ink while you are gone.
Chapter 4: Weekly and Monthly Deep Cleans
While daily tasks keep the machine running, weekly and monthly deep cleans ensure precision and longevity.
Cleaning the Encoder Strip
The encoder strip is a thin, clear plastic band that runs horizontally across the width of the printer. It is printed with microscopic vertical lines. An optical sensor on the back of the print head carriage reads these lines to know exactly where the print head is located at any given microsecond.
Over time, aerosolized ink overspray can settle on the encoder strip. When the strip gets dirty, the sensor cannot read the lines. This results in the printer “losing its place,” which causes sudden, aggressive shifting of the image, blurry prints, or “ghosting” effects.
- Weekly Action: Lightly dampen a lint-free wipe with distilled water or an alcohol-based cleaner (check your manufacturer’s specific recommendation, as strong alcohol can strip the printed lines off certain strips).
- Technique: Pinch the strip gently with the wipe and glide your fingers from one end to the other. Be extremely gentle; stretching or scratching the encoder strip will require an immediate replacement.
Flushing the Spittoon
The spittoon (or flushing box) is the area where the print head fires small amounts of ink during printing to keep all nozzles fresh. Over a month, ink builds up in this area, creating a stalagmite of dried ink that can actually grow tall enough to physically scrape the bottom of the delicate print head.
- Monthly Action: Remove the foam pad from the spittoon, soak it in warm water or cleaning solution to dissolve the ink, and flush the area. Ensure the drain tube leading to your waste ink bottle is completely clear and flowing freely.
Chapter 5: Pretreatment Best Practices and Pitfalls
You cannot discuss custom apparel production without diving into pretreatment. Unless you are printing purely CMYK on white garments, you must use pretreatment.
Pretreatment is a liquid chemical primer applied to the garment before printing. It acts as a coagulant. When the wet white ink hits the wet or dry pretreatment on the shirt, a chemical reaction occurs, causing the white ink to instantly flash-gel. This prevents the white ink from soaking into the fabric, creating a smooth, opaque surface for the CMYK colors to sit on top of.
Pretreatment Liquid for Cotton Shirts
Standard pretreatment liquid for cotton shirts is generally straightforward to use, but poor application can ruin both your garment and your printer.
- Application Method: While hand-spraying is possible, a dedicated automatic pretreatment machine is highly recommended. It ensures an even, consistent coat, saving money on wasted chemicals and preventing patchiness in your final prints.
- Distance from Printer: Never pretreat garments in the same room as your machine. Aerosolized pretreatment particles will float through the air, land on your machine’s rails, encoder strip, and print head, and cause a catastrophic chemical reaction with the ink inside the machine. Keep your pretreatment station in a separate, well-ventilated room.
The Challenge of Printing on Dark Polyester Blends
The industry has evolved beyond basic 100% cotton tees. Today’s customers demand athletic wear, tri-blends, and performance fabrics. However, printing on dark polyester blends introduces two massive hurdles: dye migration and chemical rejection.
Polyester dyes are sensitive to heat. When subjected to the high heat required to cure DTG ink, the dyes in the polyester can turn back into a gas and bleed through your white ink layer—turning a crisp white logo pink on a red shirt, or grey on a black shirt.
- Poly-Specific Pretreatment: You must use a pretreatment specifically formulated for dark polyester. These formulas create a thicker barrier to block dye migration.
- Low-Cure Inks: If your brand focuses heavily on activewear, look into inks and pretreatments designed to cure at lower temperatures (around 260°F – 280°F instead of the standard 330°F).
Chapter 6: Curing – The Final Step to Wash Fastness
You have maintained your printer perfectly. The environment is humidified. The print is flawless. But if you fail at the curing stage, the design will wash down the drain the very first time the customer does their laundry.
Knowing exactly how to cure textile ink is what separates amateur hobbyists from professional commercial printers. Curing is the process of using heat to completely evaporate the water and carrier fluids from the ink, allowing the binders to cross-link and permanently adhere the pigment to the fabric fibers.
Heat Press vs. Conveyor Dryer
There are two primary ways to cure DTG prints:
1. The Heat Press Ideal for small to medium-sized shops, a heat press uses direct, contact heat to cure the ink.
- Pros: Compact, affordable, and presses the fabric fibers down, resulting in a smooth, vibrant finish.
- Cons: Slower production time. You can only cure one shirt at a time.
- Best Practices: Always hover the heat press over the wet print for 10-15 seconds before clamping it down. This prevents the wet ink from smudging or sticking to your protective sheet. Use a high-quality Kraft paper or a Teflon sheet to protect the print. Pressure should be light to medium.
2. The Forced Air Conveyor Dryer The gold standard for high-volume, print on demand operations. The shirt moves on a belt through a long, heated tunnel.
- Pros: Incredible throughput. Capable of curing hundreds of shirts per hour. Does not flatten the garment, leaving a softer hand-feel.
- Cons: Expensive, requires a massive footprint, and uses a lot of electricity.
- Best Practices: DTG inks require time to cure, not just heat. A conveyor dryer must rely on forced hot air (convection), not just infrared panels. The shirt must remain inside the heating chamber for roughly 2.5 to 3.5 minutes at 320°F (160°C).
Achieving Ultimate Wash Fastness
The wash fastness of digital apparel prints—how well they survive repeated trips through the washing machine—is entirely dependent on the holy trinity of DTG:
- The correct amount of pretreatment.
- Adequate ink volume.
- A complete and thorough heat cure.
If a customer complains that a print cracked, faded, or peeled after one wash, it is almost certainly an issue of under-curing. To verify your process, regularly perform a wash test: print a shirt, cure it, and run it through a harsh wash and dry cycle. If it holds up, your parameters are correct.
Chapter 7: Hardware and Software Synergy
Machine longevity isn’t solely about physical cleaning; it’s also about optimizing how the machine operates through software and accessories.
RIP Software for Color Accuracy and Ink Efficiency
Your printer does not understand image files like JPEGs or PNGs on its own. It relies on Raster Image Processor (RIP) software to translate the colors on your computer screen into the exact CMYK and White ink droplet instructions needed for the print head.
High-quality RIP software for color accuracy does more than make prints look good; it actively extends the life of your machine by optimizing ink usage.
- Choke Settings: RIP software allows you to “choke” (shrink) the white underbase slightly. This ensures no white ink peeks out around the edges of the color layer, saving ink and producing a cleaner print.
- Ink Drop Sizing: Advanced RIPs control the variable droplet size. By laying down the exact necessary volume of ink rather than flooding the garment, you prevent pooling, reduce the strain on your ink delivery system, and lower your cost per print.
- ICC Profiles: Utilizing proper color profiles prevents the printer from overworking. If the software knows exactly how to mix Cyan and Magenta to hit a specific blue, it won’t waste unnecessary ink trying to saturate the fabric.
Adapting with Platen Sizes for Different Apparel
A major advantage of DTG over other methods is versatility. However, attempting to print a small baby onesie on a massive 16×20 inch adult platen is asking for trouble. The excess fabric will bunch up, creating wrinkles. If a wrinkle sits higher than the rest of the shirt, it will physically strike the print head as the carriage moves back and forth.
Print head strikes are the number one cause of sudden print head death.
- Use the Right Platen: Always swap out your platen sizes for different apparel. Use dedicated sleeve platens, youth platens, and infant platens.
- Platen Height Adjustment: Ensure your machine’s optical height sensor is clean and functioning. The platen should be as close to the print head as possible to ensure crisp, high-resolution prints, but far enough away to clear thick seams, pockets, or zippers safely.
Chapter 8: Business Implications & Production Costs
From a business perspective, proper maintenance directly dictates your profitability. When starting a boutique t-shirt brand, margins can be tight. You must understand how equipment care impacts the bottom line.
Calculating Custom T-Shirt Production Costs
When quoting a job, most new business owners factor in the cost of the blank garment, the cost of the ink, and shipping. But they forget the hidden costs of maintenance and downtime.
Let’s break down the true cost of a neglected printer:
- Wasted Garments: If a clogged nozzle causes a misprint halfway through a job, you lose the cost of the blank hoodie, the pretreatment, the ink already laid down, and the labor time.
- Wasted Ink: Running repeated heavy print head cleanings to clear preventable clogs can literally wash dollars down the drain into the waste ink tank.
- Catastrophic Failure: A ruined print head can cost between $1,500 and $3,500 to replace, not including the cost of a technician’s travel and labor.
- Opportunity Cost: If your machine is down for five days while waiting for parts, how many orders did you have to refund? How many customers will leave a negative review because of delayed shipping?
A well-maintained machine is highly profitable. A poorly maintained machine is a money pit. Factor your daily 15-minute maintenance routine into your daily labor costs—it is the best insurance policy you can buy.
Scaling Print on Demand
If your business model revolves around print on demand (POD), where orders come in organically through an e-commerce platform and must be shipped within 48 hours, machine uptime is critical. POD requires extreme agility. You might print a black cotton hoodie, followed immediately by a white canvas tote bag, followed by a grey tri-blend tee.
To maintain efficiency in a POD environment:
- Batch your orders by dark garments (requiring pretreatment/white ink) and light garments (CMYK only). This streamlines the pretreatment process.
- Keep spare parts on hand. Every serious print shop should have a “crash kit” containing spare wiper blades, capping stations, dampers, and filters. Waiting 48 hours for a $20 part to ship can bottleneck your entire production line.
Chapter 9: Industry Comparisons – Finding Your Lane
It is easy to get caught up in industry hype. New technologies emerge constantly, and shop owners frequently debate which printing method reigns supreme. Let’s compare DTG to its primary competitors to understand where it shines and where its maintenance profile differs.
Direct to Garment vs Screen Printing
The oldest debate in the custom apparel world is direct to garment vs screen printing.
- The Setup: Screen printing requires separating the artwork by color, burning a physical mesh screen for each color, taping the screens, mixing plastisol inks, and registering the press. It is highly labor-intensive to set up, making it unprofitable for small runs. DTG, on the other hand, requires zero physical setup. You drag the file into your RIP software and hit print.
- The Run: Once set up, a manual or automatic screen printing press can churn out hundreds of identical shirts incredibly fast and at a fraction of the ink cost of DTG.
- The Artwork: Screen printing struggles with photorealism and massive color counts. DTG excels at high-resolution, full-color photography and complex gradients.
- The Maintenance: Screen printing maintenance involves aggressive chemical washouts, reclaiming screens, and dealing with messy plastisol. DTG maintenance is highly technical, involving digital sensors, micro-plumbing, and precise environmental control.
Ultimately, DTG is the undisputed king for low-volume, high-color custom orders, while screen printing remains the champion of high-volume bulk orders.
Direct to Film vs Garment Printing
The newest disruptor in the apparel industry is Direct to Film (DTF). In this process, the design is printed onto a special PET film using similar inkjet technology. While the ink is wet, an adhesive powder is applied and melted into the ink. The film is then heat-pressed onto the garment, transferring the image.
When comparing direct to film vs garment printing, there are notable differences in maintenance and application:
- Versatility: DTF can be applied to almost any fabric—nylon, untreated polyester, canvas, and cotton—without the need for liquid pretreatment.
- Feel (The Hand): DTG ink penetrates cotton fibers, leaving a soft, breathless feel on the garment. DTF is a transfer; it sits on top of the fabric. While modern DTF is very thin, it still feels slightly plastic or rubbery compared to a high-quality DTG print.
- Maintenance Profile: DTF printers still use white pigment ink, meaning they suffer from the exact same print head clogging risks as DTG machines. They also introduce a new maintenance headache: the adhesive powder. If the fine adhesive powder becomes airborne and lands inside the printer’s sensitive tracks or optical sensors, it can cause severe mechanical damage. DTF setups require massive ventilation to remove the toxic fumes generated by melting the adhesive powder.
Both technologies are fantastic, but DTG remains the premium choice for retail-quality, soft-feel cotton apparel.
Chapter 10: Troubleshooting Common DTG Issues
Even with immaculate maintenance, you will occasionally encounter issues. Being able to diagnose a problem swiftly will save you hours of frustration. Here are the three most common issues and how to fix them.
Issue 1: Banding (Horizontal Lines in the Print)
Banding is the most common visual defect in digital printing. It looks like the printer skipped horizontal rows of ink, creating a striped effect.
- The Cause: Banding is almost always caused by missing nozzles (clogs) or improper feed calibration.
- The Fix: Run a nozzle check. If nozzles are missing, perform a cleaning cycle. If the nozzle check is 100% perfect but you still see banding, your platen feed requires calibration. The platen is moving slightly too fast or too slow between print passes, causing the rows of ink to overlap or gap. Consult your RIP software or machine manual to adjust the feed step.
Issue 2: Ink Starvation (Print Starts Fine, Then Fades)
You begin printing a large, vibrant graphic. Halfway down the shirt, the white underbase starts to fade, and the colors look washed out and weak.
- The Cause: The print head is demanding ink faster than the delivery system can provide it. This is usually caused by an air leak in the ink lines, a failing damper (the small reservoir directly above the print head), or a clogged ink filter.
- The Fix: Inspect the ink lines for visible air bubbles. Check the dampers to ensure they are at least half full of ink. If the machine is over a year old and you are experiencing starvation, it is highly likely that your dampers or lines need to be replaced.
Issue 3: Peeling or Flaking After Washing
Your customer sends you a photo of a hoodie they washed once, and the design looks like peeling sunburned skin.
- The Cause: This is a curing failure or a pretreatment failure. Either the pretreatment was too thick and never locked into the fibers, or the heat press did not reach the proper internal temperature to fully evaporate the water in the ink.
- The Fix: Check the temperature of your heat press using a digital laser thermometer—never trust the digital display on a cheap heat press, as they can be off by as much as 30 degrees. Ensure you are using heavy pressure and the correct time duration for the specific brand of ink you are using. Furthermore, educate your customers: digital apparel prints should always be washed inside-out on a cold, gentle cycle and tumble-dried on low heat to maximize longevity.
Chapter 11: Training Your Team for Success
As your custom apparel business grows, you will inevitably step away from daily production and hire staff to run the machines. Transitioning from owner-operator to manager is a critical point where printer maintenance often falls apart. Nobody cares about an expensive machine as much as the person who bought it.
To ensure your investment survives your employees, you must build foolproof systems.
- Create Maintenance Checklists: Do not rely on memory. Laminate daily, weekly, and monthly maintenance checklists and attach them directly to the machine. Employees must physically initial the checklist every single morning and evening.
- Assign Accountability: Make one specific person the “Lead Technician” for the machine. If everyone is responsible for cleaning, no one is responsible.
- Standardize the Workspace: Everything should have a home. Keep your lint rollers, foam swabs, distilled water, and cleaning solutions on a dedicated, organized rolling cart next to the printer. If cleaning is convenient, it will get done. If an employee has to search the warehouse for a swab, they will skip the step.
Conclusion
Owning and operating a direct-to-garment printer is an incredibly rewarding endeavor. It empowers you to bring complex, vivid imagination to life on fabric with the click of a button. It allows businesses to offer unparalleled custom apparel with zero setup fees, driving the modern print on demand revolution.
However, the line between a thriving, profitable print shop and a stressful, money-losing nightmare is drawn entirely by maintenance. A dtg printer is not a “set it and forget it” tool. It is a partnership. If you take care of the environment, respect the chemical nature of the inks, diligently clean the mechanical components, and refine your curing and pretreatment processes, the machine will take care of your business.
Build your daily habits, keep your humidity dialed in, stay vigilant over your white ink lines, and never cut corners on your deep cleans. By following the meticulous practices outlined in this guide, you will not only prolong the life of your equipment, but you will consistently produce retail-quality, breathtaking garments that keep your customers coming back for years to come. Happy printing!