Ever stared at a blank screen, needing to create a flyer or a social media post, and just… felt stuck? You know what you want to say, but making it look good feels like a job for a professional. What if you could create something beautiful in the next 10 minutes, without any design experience at all? That’s exactly the promise of a tool called Canva. Best way to find the Canva training.
Think of Canva as an online design playground, made specifically for people who don’t consider themselves “creative.” It’s a free tool that provides thousands of pre-made designs—like fill-in-the-blank templates for everything from event announcements to business presentations. This approach is the foundation for our Canva training because it delivers easy graphic design for non-designers from the very first click, focusing on results, not complicated rules.
In practice, this means you can finally stop wrestling with confusing software. Instead of spending hours trying to get text and images lined up perfectly, you can customize a professional layout in minutes. A polished Instagram story, a clean and modern resume, or a standout presentation slide is no longer a major project. You simply choose a design that inspires you and make it your own by swapping the text and photos.
This guide is a friendly, step-by-step walkthrough to learn Canva from scratch, covering the simple, practical skills you need to create your first project with confidence. By the end of this article, you won’t just understand what Canva is—you will have the tools to bring your own ideas to life, quickly and beautifully.
Your First 5-Minute Design: How to Use a Canva Template for an Instant Win
Staring at a blank page is the hardest part of any creative project. That’s why the secret to getting started with a great Canva design is to never start with a blank page. Instead, you’ll use a template. Think of a template as a stunning, professionally-made design that’s about 90% finished for you. All you have to do is add your personal touches. It’s the ultimate shortcut to a beautiful result, and a core part of this getting started with Canva guide.
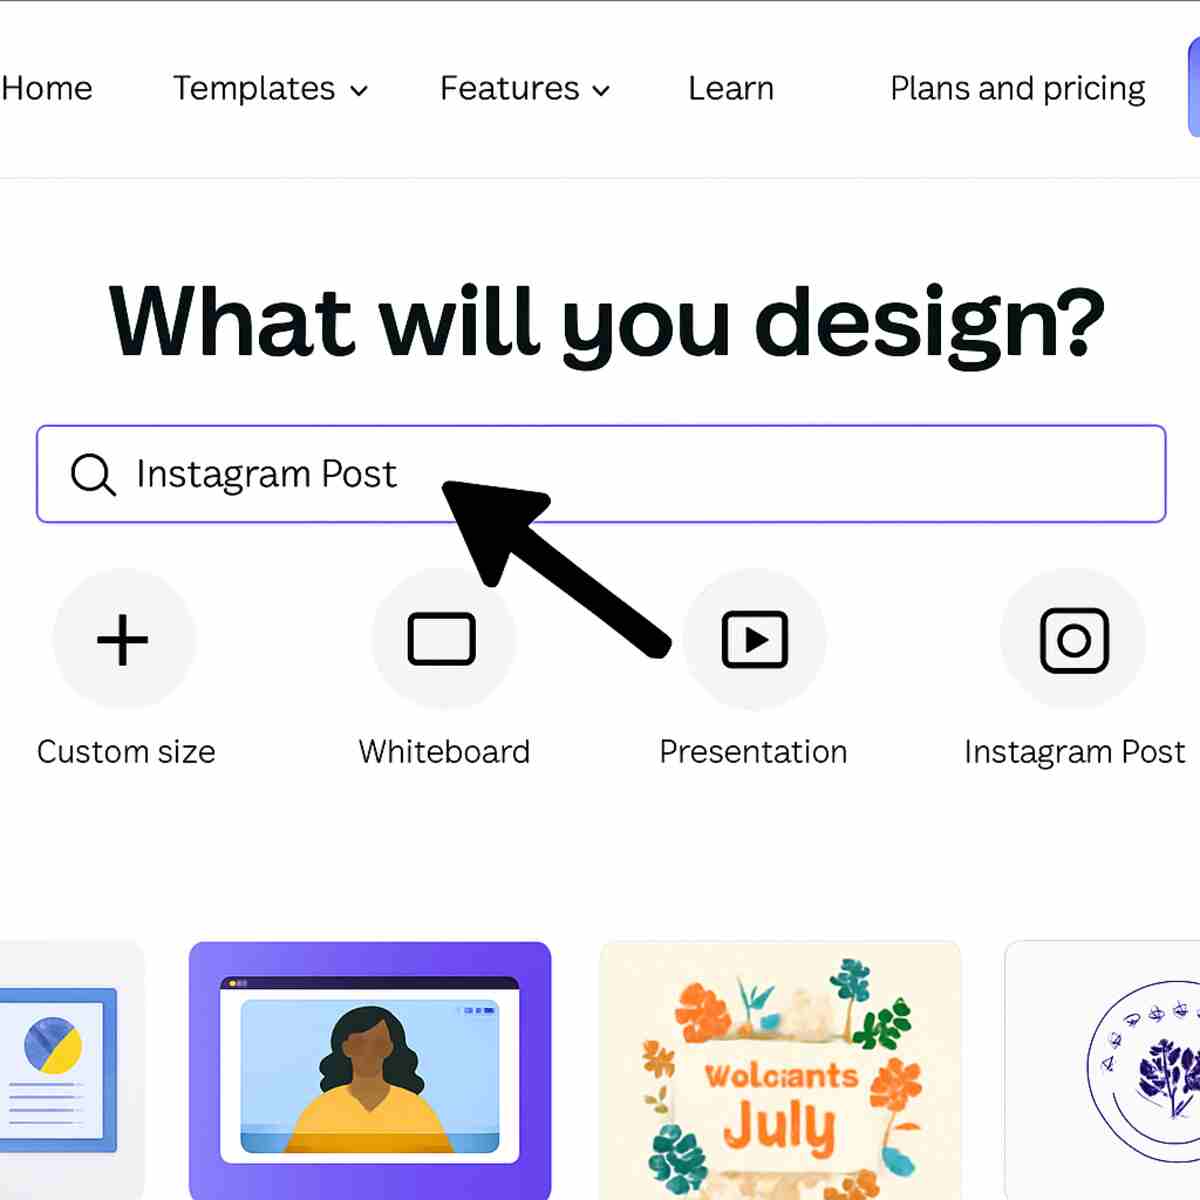
Finding the perfect template takes less than a minute. On the Canva homepage, you’ll see a large search bar right at the center of the screen. That’s your gateway to thousands of options.
- Type what you want to make into the search bar (for example, “birthday invitation” or “Instagram post”).
- Browse through the huge variety of styles that appear and simply click on one you like.
- The design will instantly open up in a new tab, ready for you to edit.
You have a gorgeous design waiting for you in the Canva editor. You didn’t have to worry about layouts, font pairings, or color schemes—the professionals already handled it. Now for the fun part: making it your own. The next section covers the three most important skills for customizing your new template.
The 3 Core Skills: How to Change Text, Photos, and Colors in Your Template
With your chosen template now open, you’re looking at a design that is ready to be transformed. Making it your own only requires three fundamental skills, all of which are as intuitive as using a simple word processor. The first and most common change you’ll make is editing the text. To do this, simply double-click on any heading or sentence. A blinking cursor will appear, allowing you to delete the placeholder words and type in your own message, whether it’s a birthday wish or a new headline for your business.
Next, let’s tackle the images. Swapping out photos is one of the most satisfying parts of learning how to use Canva, and it feels a bit like magic. In the menu on the left side of your screen, you can either search for a new picture in the “Elements” tab or upload your own using the “Uploads” tab. Once you find one you love, just click, drag, and drop it directly on top of the old image. It will instantly snap into place, perfectly resizing itself to fit the frame.
To truly make the template match your style, you’ll want to adjust the colors. This is one of those Canva tips and tricks for beginners that makes a huge impact. Just click on any object you want to change—like a background, a shape, or even the text itself. When you do, a small color square will appear in the toolbar at the very top of the editor. Clicking that square opens a color palette where you can select a new shade, instantly updating your Canva design.
In just a few minutes, you’ve mastered the core actions needed to customize any template. By swapping out the words, images, and colors, you’ve already turned a generic layout into a personal creation. But what if you want to add a little extra flair, like a decorative line or a fun icon? For that, we’ll open up Canva’s digital craft box.
Your Digital Craft Box: How to Add Shapes and Icons from the ‘Elements’ Library
That “digital craft box” we mentioned is called the Elements tab, and it’s where Canva keeps an enormous library of creative assets. Located in the main menu on the left, this is your go-to spot for adding anything from a simple dividing line to a fun birthday cake icon. Think of it as a massive digital sticker book and art supply store all in one, full of pieces you can use to give your Canva design a custom touch beyond the template.
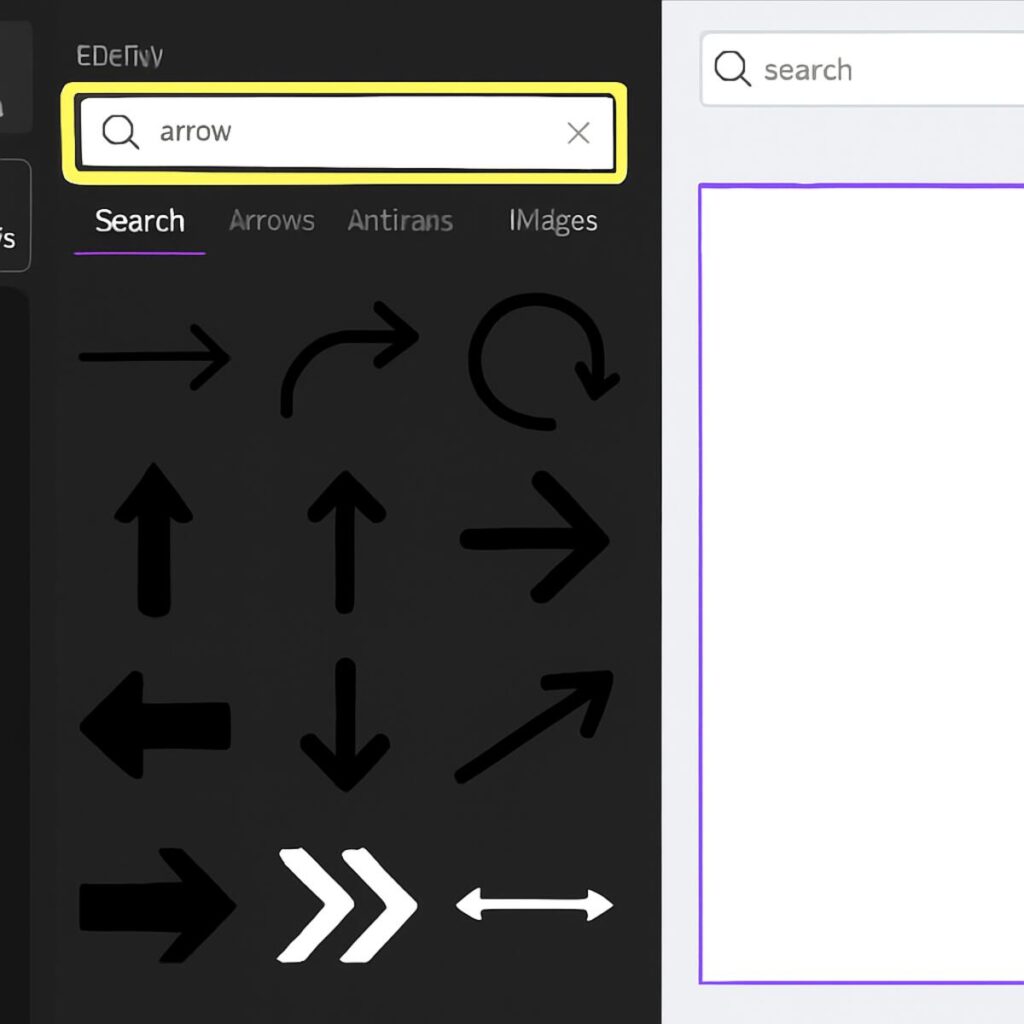
Using it is wonderfully straightforward. Imagine you want to draw attention to a key piece of information on your flyer. Simply click into the Elements search bar and type what you’re looking for—like “arrow” or “star.” As you type, a gallery of graphics, photos, and shapes will appear below. When you find one you like, just give it a click. The element will instantly pop onto the middle of your page, ready for you to place.
Once an element is on your design, you have full control. You can click and drag it to the perfect spot or use the small white dots in the corners to resize it. This simple process of searching and placing is what allows you to build a truly unique design. While Canva Elements offers endless options for graphics, the ultimate personalization often comes from using your own content. Next, we’ll cover how to add your own logo or a favorite photo to complete your project.
Making It Personal: How to Upload and Use Your Own Logo or Photo
While the Elements library is great for adding general graphics, what happens when you need something specific, like your company logo or a favorite family photo? This is where the Uploads tab shines. Think of it as your personal media library right inside Canva, a dedicated space for all the images and logos that belong only to you. Using your own content is the key to transforming a generic template into a one-of-a-kind design.
To get your files into this library, look for ‘Uploads’ in the left-hand toolbar and click the prominent ‘Upload files’ button. This is a core part of learning how to use Canva effectively. A new window will pop up, allowing you to browse the files on your own computer. Simply navigate to the image you want, select it, and click ‘Open.’ You’ll see your file appear right in your Uploads gallery, ready to be added to any project, now or in the future.
Getting your image onto the page is just as easy as adding an element from one of our previous Canva tutorials. You can either click on your uploaded picture to add it to your design or—for a bit of magic—drag it directly over an existing photo in a template. Canva will intelligently snap it into place, perfectly replacing the old image with yours. With your own content now in the design, your project is officially complete and unique. All that’s left is to get it out of Canva and into the world.
The Finish Line: How to Download Your Design for Social Media or Print
You’ve tweaked the text, swapped the photos, and added your personal flair. Congratulations—your design is complete! All that’s left is to get it out of Canva and onto your computer so you can share it with the world. This final step is quick, and knowing how to do it is a core part of any beginner’s Canva training.
To start the process, look for the Share button located in the top-right corner of the editor. When you click it, a menu of options will appear. You’ll want to find and select the Download button, which will take you to the final settings screen before your file is saved.
This next screen asks you to choose a “File Type,” which can seem confusing. Here’s a super simple way to decide: think of JPG as the best choice for designs that are mostly photographic, and PNG as the best choice for graphics that have text, logos, or sharp lines. For most social media posts or simple flyers, PNG is a great, safe bet because it ensures your text stays extra crisp and clear.
Once you’ve picked your format, simply click the purple Download button. Your finished file will save right to your computer, ready for you to upload to social media or attach to an email. Now that you’ve mastered this piece of easy graphic design, what happens when you need that same great post in a totally different shape, like turning it into a flyer? The platform has a way to magically resize your creation for any purpose.
From Post to Flyer: How to Easily Resize Your Design for Different Needs
One of the biggest hurdles in digital design is that every platform has its own preferred shape. A square Instagram post won’t fit perfectly in a tall, skinny Instagram Story, and neither will work as a rectangular flyer. A great-looking Canva design in one format can look broken in another. So, how do you adapt your work without starting from scratch every single time?
For those who need to resize designs often, Canva Pro offers a feature called Magic Resize. It’s exactly what it sounds like: a tool that lets you select multiple new sizes (like “Facebook Post” and “Pinterest Pin”), and with a single click, it creates copies of your design automatically formatted for each one. While it sometimes requires a few minor adjustments, it’s a massive time-saver for businesses or creators who post across many channels.
But what if you don’t have Canva Pro? Don’t worry, there’s a simple and free workaround that’s among the most useful Canva tips and tricks for beginners. First, create a new, blank design in the size you need. Then, go back to your original design, select all the elements (a quick way is to press Ctrl+A on a PC or Cmd+A on a Mac), and copy them. Finally, switch to your new blank design and paste everything in.
With this simple copy-and-paste technique, you can instantly move all your work into a new canvas. You’ll likely need to drag a few things around to fit the new dimensions, but it saves you from having to find all your fonts, colors, and images again. Now that you can adapt a design for any size, you can also create a design with multiple pages, like for a school or work project.
Beyond Social Media: How to Create a Simple, Professional Presentation
Your design skills aren’t limited to single images. Canva is also a powerful and easy-to-use alternative to traditional presentation software, perfect for that next book report, team meeting, or project pitch. The process is surprisingly similar to making a flyer, but instead of one page, you’re building a whole deck. This is one of the most common answers to the question, “what can you create with Canva?”—and one of the most useful.
Getting started with creating presentations in Canva is straightforward. On the homepage, simply search for “Presentation.” You’ll find thousands of templates, each containing a full set of pre-designed slides. Once you pick one, you can edit the title slide just like any other design. Need another slide? Click the “Add page” button below your canvas. Canva will even suggest different layouts from your chosen template (like a bullet-point page or a photo-heavy page) to keep your design looking consistent and professional.
When your slides are ready, you don’t need to export a clunky file. The real magic is in Canva’s built-in “Present” button, typically found in the top-right corner. Clicking it instantly turns your design into a full-screen, interactive slideshow. To make your delivery even smoother, keep these simple tips in mind:
- Stick to one main idea per slide to keep your audience focused.
- Use large, clear text that can be read from a distance.
- Click “Present” and select “Presenter View” to see your own private notes while your audience sees only the slide.
Now that you’ve seen how Canva handles everything from a single post to a full presentation, you might be wondering about those features marked with a little crown icon. It’s natural to ask if it’s time to upgrade. Here’s a breakdown of the differences between the free and paid plans.
Is Canva Pro Worth It? A Plain-English Guide to the Free vs. Paid Plan
As you explore Canva, you’ll notice some of the best templates and features have a gold crown icon. This brings up the big question: is Canva Pro worth it? For many, the free version is more than enough to create stunning designs. The Pro plan isn’t about unlocking the tool itself, but about solving specific, repetitive frustrations with powerful shortcuts.
One of the most popular Pro features is the Background Remover. Imagine you have a great photo of a product or a person, but the background is cluttered. With one click, this tool magically “cuts out” your subject, leaving a clean, professional image you can place on any background. It’s like having a digital pair of precision scissors that does all the work for you in an instant.
Upgrading to Pro also unlocks Canva’s entire library of millions of premium photos, graphics, and fonts. Beyond the extra content, Pro is packed with time-savers for those who create graphics frequently. Mastering these advanced features, often through dedicated Canva training or Canva courses, can dramatically speed up your workflow from minutes to seconds for common tasks.
So, should you upgrade? If you create a few designs a year for fun, the free plan is fantastic. But if you’re running a small business, managing social media, or creating content regularly, Canva Pro can save you hours each month. For businesses, one of the biggest time-saving tools is the Brand Kit, designed to keep your look perfectly consistent across every single design.
What is a Brand Kit? The Pro Time-Saving Trick for Consistent Designs
The Brand Kit is Canva’s answer to one of the most tedious parts of creating content: keeping everything consistent. Think of it as a special digital closet for your brand’s identity. Instead of digging through folders for your logo or trying to remember the exact code for your signature color, the Brand Kit stores it all for you in one central place. The goal is brand consistency—ensuring that every flyer, social media post, or presentation you create instantly looks like it came from you, creating a polished and professional image every single time.
With a Brand Kit set up, you can upload all your logos, lock in your specific brand colors, and save your preferred fonts. Then, when you’re working on a new design, these assets appear right inside the editor, ready to apply with a single click. This simple function is key to understanding brand kits in Canva; it’s not just storage, it’s an active shortcut. This is especially powerful for businesses, as it ensures anyone on the team can create on-brand materials without needing a cheat sheet, a topic often covered in-depth in a Canva for Teams tutorial.
For anyone creating content regularly, this feature alone often answers the question of is Canva Pro worth it. It transforms a repetitive chore into a thoughtless, one-click action, saving you valuable time and guaranteeing a cohesive look. While the Brand Kit streamlines how you apply your existing identity, Canva is also pioneering new ways to create designs from scratch using artificial intelligence.
An Introduction to Canva Magic Studio: What Can AI Do For You?
You’ll find these groundbreaking tools collected under one name: Canva Magic Studio. If the term “AI” or “artificial intelligence” sounds complex, don’t worry—think of it as having a helpful creative assistant built right into the platform. Its entire job is to help you overcome the two biggest hurdles in any project: starting from a blank page and finding the right words. This Canva AI is designed to be a partner, not a pilot.
One of the most impressive features is Magic Design. Have you ever had the perfect photo for an event but no idea how to build a flyer around it? With Magic Design, you simply upload that picture, and Canva instantly generates a variety of unique, editable templates using your image. It’s like handing a photo to a designer and getting back half a dozen different poster concepts in a matter of seconds.
The assistance isn’t just limited to visuals, either. We’ve all stared at a beautiful design, happy with the look but completely stuck on what to write. That’s where Magic Write comes in. Acting as your personal brainstorming partner, it can help you generate everything from catchy headlines to short descriptions. This is one of the most useful Canva tips and tricks for beating writer’s block and getting your message out clearly.
Ultimately, using Canva Magic Studio features is all about saving you time and conquering those moments of creative doubt. But while AI offers a powerful way to get a head start, it isn’t the only way to speed up your work. As you get more comfortable, learning a few simple keyboard shortcuts and design habits can make your workflow even more efficient.
5 Beginner Tips and Keyboard Shortcuts to Help You Design Faster
While AI tools offer a fantastic head start, you can also dramatically speed up your own design process with a few simple habits. Think of it like learning to type without looking at the keys—once you build the muscle memory, you’ll be amazed at how quickly you can bring your ideas to life. This part of our Canva training is all about turning clicks into keystrokes and making you more efficient.
Ready to feel like a pro? Here are five simple Canva tips and tricks for beginners that you can start using right now:
- Press ‘T’ for Text: Instead of navigating to the Text menu, just hit the ‘T’ key on your keyboard to instantly add a new text box to your design.
- Group Elements Together: Do you have a logo and a tagline that always need to move together? Click and drag your cursor over both items, then click the “Group” button that appears. Now they are locked together as a single unit.
- Duplicate with a Drag: Need another copy of an icon or shape? Hold down the Alt key (or Option on a Mac) and simply drag the element. A perfect copy will be created instantly.
- Align Like a Pro: To make your design look neat and polished, select multiple elements. Then, click the “Position” button at the top right and use the alignment tools to make them perfectly centered or spaced.
- Quick Shapes: Press the ‘R’ key for a rectangle or the ‘C’ key for a circle. It’s the fastest way to add a basic shape without searching the Elements library.
Putting these small actions into practice is the key to mastering Canva keyboard shortcuts. You’ll spend less time hunting through menus and more time focusing on your creative message. Now that you’ve seen how easy a dedicated design tool can be, you might be wondering how Canva stacks up against other free options.
Canva vs. Adobe Express: Which Free Design Tool Should You Start With?
Now that you’ve seen how powerful Canva can be, you might wonder about its competitors. The biggest name you’ll encounter is Adobe Express, and the Canva vs Adobe Express debate can seem confusing at first. For someone just starting out, however, the choice is much simpler than you might think. It really comes down to what you need right now and how quickly you want to get started.
Think of Canva as the friendliest, most well-stocked craft store you’ve ever visited. It’s designed from the ground up to be incredibly welcoming, with a massive library of ready-to-use templates that make easy graphic design for non-designers a reality. Within minutes, you can find a design you like, swap out the text and photos, and have something that looks great. The entire experience is built to give you a quick, satisfying win without any prior design knowledge.
Adobe Express, on the other hand, comes from a family of famous professional creative tools like Photoshop. While it has become much more user-friendly, its main strength lies in how well it connects with those other Adobe programs. If you already use or plan to dive into the full Adobe creative suite, Express will feel like a natural part of that ecosystem. For most beginners, however, it can feel a bit more structured and less immediately intuitive than Canva.
So, which should you choose? For the vast majority of people just dipping their toes into design, Canva is the clear winner. Its straightforward approach and massive template selection remove the intimidation factor, helping you create something you’re proud of, fast. Once you’re comfortable, you can always explore other tools, but starting with a solid foundation is key. In fact, taking a free online Canva course is the perfect next step to build that confidence.
Your Next Steps: Where to Find More Canva Training and Inspiration
Just a short while ago, the idea of creating a graphic from scratch might have felt intimidating. Now, you hold the power to transform a blank page into a polished, professional-looking design. You’ve moved from wondering where to start to confidently navigating templates, customizing text and images, and downloading a finished product ready to share with the world.
This is the most important part of any Canva training: putting your new skills to use. The best way to lock in what you’ve learned is to practice. To help you get started, here is a simple challenge to cement your knowledge and build momentum.
Your Canva To-Do List:
- Challenge yourself: Try to create a birthday card for a friend or family member.
- Explore: Click on a design type you’ve never tried before, like ‘YouTube Thumbnail’ or ‘Resume’, just to see what’s there.
- Get inspired: Spend five minutes browsing the Canva template library simply to see what’s possible.
You didn’t just learn Canva from scratch; you’ve unlocked a new way to bring your ideas to life. As you continue, you may even explore more advanced Canva courses, but remember that the journey begins with a single design. Forget about perfection and focus on the joy of creating. You now have the tools and the knowledge to make something great all on your own.